We have new forums at NiteshKothari.com
TopBottom

Did you like this Blog?
Subscribe for my feeds to get updates:


Subscribe Via Email for Free:
TwitterCounter for @milanparmar

Announcement: wanna exchange links? contact me at clwolvi@gmail.com.

Money Management: How To Control Overspending

Posted by Milan at 12.16.2009
Share this post:
Ma.gnolia DiggIt! Del.icio.us Yahoo Furl Technorati Reddit

Needless to say, a person is over excited, full of joyous mood while on holidays. This leads to the most common mistake- Overspending. I bet your joyous mood thaws when you sit back and calculate the amount spent after holidays. Overspending is obvious consequence when you have credit card with you. It is rather easier to spend money with credit card as you don't see physical money exchange. You would probably think twice to purchase an item for 300 bucks if needed to make cash payment or, you would do it easily with credit card otherwise.


What is the way out?

Pre paid credit cards is way better solution to avoid running in overspent-holidays-aftermath situation. Unlike conventional credit card (which allocates the amount you don't have in account), pre paid credit card works by allowing to spend the amount which you have deposited in account. While it enables to do everything one can do with credit card it also reminds you the spending limit every time you make transaction.


Pre paid card is something you should get around with but, it’s not just enough, it's not complete solution. Planning holidays and other expenses right from the beginning of New Year is very important to set platform for better financial year. Moreover Christmas Eve is around the corner. Ostensibly we are all over excited. Groceries stores have started discount schemes, Mannequins out side the cloth stores are being setup in Santa getup. Commercials have started bombarding us with invigorating slogans furnished with marketing tricks. With all that going around we need to make sure that we are not being drawn in emotions.


Do This


Make a list of holidays and expenses throughout the year

Figure out your annual income

Keep some amount aside for emergency

Set maxium amount to be spent for each occasion

Get pre paid credit card

Deposite the set amount for the occasion

And at the last enjoy!!!!

Labels:

DLL Files: How To Fix Correpted Or Missing DLL Files

Posted by Milan at 12.02.2009
Share this post:
Ma.gnolia DiggIt! Del.icio.us Yahoo Furl Technorati Reddit

Do you get error like...


A system file required by the application has been deleted.


OR

Required dll file is corrupted


This can happen after uninstalling software, running a disk clearer utility, or after an attempt to tidy up the hard disk by removing files and folders that don't appear to be used.


Cause of DLL files (such as Hal.dll) missing a system file required by the application has been deleted. This can happen after uninstalling software, running a disk clearer utility, or after an attempt to tidy up the hard disk by removing files and folders that don't appear to be used.


How To Solve DLL Files Problem


Solution 1


Reinstall the application that is reporting the error. This will usually replace any missing components as well as put right any registry entries that might be contributing to the error.

Solution 2


If you recently uninstalled another program, and suspect that the error began to occur subsequent to this, reinstall that program again, or use System Restore (if you're running Windows Me or XP) to roll back to a date before the problem occurred.


Solution 3


Try downloading a copy of the DLL from this web site. A few of the most commonly required DLLs are available for download from the table below. If the file you require is listed, download it, run it, read and agree to the disclaimer text, and keep clicking on Next. The installer will install the file into its normal location, checking that it is for the right version of Windows and that it isn't overwriting a newer version in the process.


Solution 4


Use the search page to try to locate a copy of the file. If you find it, download it and install it in the correct location. This can be C:\Windows\System32 (Windows NT, 2000 or XP), C:\Windows\System (Windows 95, 98 or Me) or the folder of the application that reports the error.


credit

Labels: ,

From iPhone to PC To iPhone: Transfer Music Videos Photos Files

Posted by Milan at
Share this post:
Ma.gnolia DiggIt! Del.icio.us Yahoo Furl Technorati Reddit

This iPhone app helps to.....


Backup iPhone content to PCCopy iPhone music, movies, music videos and photos to your computer, backup iPhone music and movies to your computer.


PC to Phone transfer


Transfer music, movies, music videos from PC to iPhone easily. No need to remove original iPhone files, just add what you want.


Rip iPhone files to iTunes


Easily transfer files from iPhone to iTunes for backup and management.


Supports All iPhone types


Including iPhone, iPhone 3G, iPhone firmware 2.x.


xilisoft_iphone_transfer_screenshot


Easily manage your iPhone files as a iPhone file manager


It can freely and easily transfer videos, music and photos between iPhone and PC/iTune. With this iPhone transfer software, you can transfer videos and music from iPhone to computer and transfer files from PC to iPhone with great easy, transfer your iPhone files to iTunes for backup and management. In all, Xilisoft iPhone Transfer can greatly facilitate files transfer, copy and backup among iPhone and PC for users, making us able to freely and easily manage/operate iPhone.


Supporting the latest iPhone firmware 2.x, the iPhone transfer application is superior to those iPhone softwares that cannot transfer files from PC to iPhone 2.x.


Xilisoft iPhone Transfer enables you to export files from computer to iPhone for viewing and playing, and further manages the files via iTunes. Besides transferring iPhone files, now you can use your iPhone as a portable hard disk with the iPhone transfer software installed.

Key Functions of Xilisoft iPhone Transfer


1. Ripping iPhone, backup iPhone content to PC

2. Export files from computer to iPhone, transfer from PC to iPhone


3. Copy iPhone music and videos to iTunes library

4. Make use of iPhone for portable hard disk


With Xilisoft iPhone Transfer, you are able to create and edit your own iPhone playlists with easy,view iPhone files in different mode, including List view and Illustration view, quickly locate files that you are looking for.


Play iPhone files directly


You are now able to play iPhone files with a system default player for greater convenience simply by clicking on the right-click menu.


Fast file transfer speed


Unimaginable super-fast speed which is saving you a lot of time. Get your music transferred in a few seconds!


Intuitive and user-friendly interface


This software has a clear and intuitive interface. You can know how to operate this software within a few minutes according to its intuitive navigation and wizard.


Multi-lingual support


Xilisoft iPhone Transfer support several different languages, which is suitable for users from different countries, including Chinese, English, French, German and Japanese. credit

Labels:

Adsense Guide How To Make Money With Adsense

Posted by Milan at 11.24.2009
Share this post:
Ma.gnolia DiggIt! Del.icio.us Yahoo Furl Technorati Reddit

I started a year ago with blogs,Lasvak and FragmentedBlog, and with a goal of earning $50 a day. I kept on working hard day by day and learning. Today I was able to cross my goal and reach $100 a day Mark. Its been steady from around 3 months now. And I will keep working to increase this figure.

Few points I want to share which got me here are:

1. Don't Just Plan, Implement Them

I was guilty of all planning and no implementation for long. When I started, I used to plan I will do this and that but never put my thoughts to work. I used to spend countless hours studying on DP and many blogs. But it took me lot of time to use that studying into action and actually make something. And hence i struggled a lot in the initial days. But Well one day it hit me and I started the actual work, tables start turning and since then I haven't stopped.

2. Don't Spend Time Dreaming About Money

I am not sure how many people do this but I am again guilty of this as well. In the initial days, i used to get super impressed after seeing those big check posts from bloggers and some guys here on DP. I used to day dream at least 2 hours a day on what will I do with all that money if I had it in my hands . And as its clearly visible that it would have been great, if I did some actual work to make that true.

3. Don't Buy Shit You Will Not Use

Wasted lots of money in domains which I NEVER used for my future projects(which never saw the light of the day). Before buying a website, try to make sure that you don't have a domain lying around doing nothing, built something on top of that and then go ahead buying another one. I did the same, once I had around 30 domains lying around and I was searching expired domains to buy more(stupid me yeah). But again, I gave it a thought and decided that I will only buy a new domain, if I have made use of my existing domains. And it did the trick.

PS: This domain thing doesn't apply if you are into domain flipping business or come across a killer domain.


Spent some good amount of money on databases which after buying, didn't knew how and for what to use, but yeah when someone was selling a db of 10,000 recipes i just had to get it . So, do plan in advance on what you will be doing with that DB or whatever you are spending money upon. It shoud bring some value to your projects.

4. Don't start 10 things at once, you will burn your self very fast.

Once my work picked up pace, I started working on many things together, which ultimately led to fatigue and some awful websites. Left websites with half done work and lost interest . Lesson learned, try to do one thing at a time. Start a blog/website and make sure that before you move on to another, you have at least 1000 page views per day and min $10 a day earning. Thats my way of measuring the success of a profitable website. And believe me, it requires approx 1 month of solid work to achieve that stage but once its reached you will be rest assured to a continuous stream of money coming your way. Repeat this for many websites and you have some solid earnings in the end of the month.

5. Never stop learning
Everyday new things get invented in internet world, keep your self updated on what is going around. But don't spend to much time on it. I give it around 2 hours a day to look around in forums and checking out few blogs to learn whats happening in the industry.

6. Increase to as many streams of money as possible.

Adsense, Infolinks, adbrite, chitika, affiliate marketing, link sales, paid reviews etc. You all know the drill

7. Put A Goal Infront Of You

Without a goal, you will be running endlessly. I had a goal of making $50 a day, but i crossed it and doubled the amount. I now want to do $200 a day and will try to reach to it soon. So, its pretty important to have a goal, to have something to run to and compare your progress. Do make a goal and work towards reaching it.

Ok guys, I think enough of preaching . So, I wish you all luck in your projects and for future. Thanks again for the wonderful knowledge you all have been sharing. If you need anything from me, pm me or reply here.

Credit Info

FRee Clipboard Manager For Windows

Posted by Milan at 9.18.2009
Share this post:
Ma.gnolia DiggIt! Del.icio.us Yahoo Furl Technorati Reddit

One of the most important features in Windows is the clipboard. I pretty much copy and paste text, images, folders, and files everyday on my computer. What can really make you a lot more productive is a clipboard manager/utility.

Another clipboard program that I used and liked is TenClips. TenClips is a super lightweight program for multiple clipboards in Windows.

Basically, you can store up to 10 items of text on the clipboard manager and easily switch between the 10 using a few key strokes. Note that TenClips uses the formatting in Notepad, in the sense that it will remove all text formatting before pasting.

Here's how you use the program:

  • Press Ctrl + 1 to Ctrl + 0 to switch to any of the 10 available clipboards
  • Now press Ctrl + C to copy the text into the currently selected clipboard
  • Press Ctrl + V to paste the text from the currently selected clipboard

If you want to paste a different piece of text from a different clipboard, switch to it by pressing Ctrl + X and then press Ctrl + V, where X is a number between 1 and 0.

There are a few more hotkeys that let you paste the text in special formats. For example, if you want to paste everything in uppercase, then you would press Win + Num *. To paste everything in lowercase, press Win + Num /.

For some reason, these two are confusing (Win + Num *) and I couldn't get them to work, so changing them to something straightforward will make it easier to use.

You can also change all the hotkeys to whatever you like by right-clicking on the icon in the system tray and choosing Settings.


You can also clear the entire clipboard by simply double-clicking on the system tray icon. Purified text basically means that all formatting is removed before pasting.

Overall, the program is pretty simplistic, but it gets the jobs done. If you occasionally need to copy multiple items to the clipboard, this tool is better suited since it's small and doesn't take up a lot of memory.

If you are a programmer or need to use multiple clipboards all the time, then something like Ditto might be better since it has more features. Enjoy!

Credit

Labels:

How To Upgrade Windows XP To Windows 7

Posted by Milan at 9.17.2009
Share this post:
Ma.gnolia DiggIt! Del.icio.us Yahoo Furl Technorati Reddit

Brief Description

Windows 7 Upgrade Advisor scans your PC to see if it's ready for Windows 7, and tells you about any known compatibility issues.

Overview


Windows 7 Upgrade Advisor scans your PC's system, programs and devices to check if it's able to run Windows 7. After a few minutes, the report will let you know if your PC meets the system requirements, if there are any known compatibility issues with your programs and devices, and will also provide guidance on your upgrade options to Windows 7.

Downloadhere

Labels: ,

Get Google Calender on iPhone

Posted by Milan at
Share this post:
Ma.gnolia DiggIt! Del.icio.us Yahoo Furl Technorati Reddit

Since I've gotten my iPhone, I have tried to sync up as many services as possible with the iPhone's built in email, calendar and contact apps. If you're in a corporate environment, you've probably already setup an email account using the Exchange option on the iPhone.

Unfortunately, you can only add one Microsoft Exchange account to your iPhone, so if you want to sync your Outlook calendar and Google calendar, you have to use CalDAV instead of Google Sync (which uses Exchange).

In this post, I will walk you through the steps for setting up Google Calendar on your iPhone using the CalDAV protocol, which means you can still use the Exchange option for your corporate email.

First, click on the Settings button on your iPhone home screen:

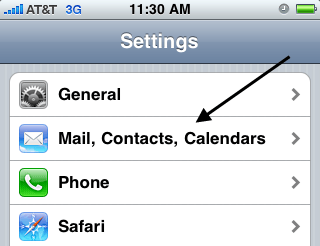
Next, click on the Mail, Contacts, Calendars option under Settings:


Next, click on the Add Account option at the bottom:

Next, click on the last option called Other:

google calendar iphone

Next, click on the Add CalDAV Account option under the Calendars heading:

Almost done! Now, you need to enter your Google account information. In the Server field, enter Google.com. Enter your full email address for the username and type in your Google account password. In the Description field, type in the name for the account that you want.

Tap the Next button at the top of the screen and you're done! Just go to the Calendar application on the iPhone and syncing will automatically start once you open it. If you have any issues, post a comment here and I'll try to help! Enjoy!


credit

Labels: ,

Customize Windows Vista To make it Windows 7

Posted by Milan at 9.16.2009
Share this post:
Ma.gnolia DiggIt! Del.icio.us Yahoo Furl Technorati Reddit


Windows 7 is the next generation operating system by Microsoft.Windows 7 is now at beta stage and will be released at about year 2009-2010.
Now user can try the feeling using 'Windows 7′ by changing the theme of Windows Vista.These are the steps.
Because Windows Vista doesn't allow user to use third-party theme,so user need to patch system files in order to use the third-party theme.User need to patch 3 system files to use third-party theme in Windows Vista.The files are:

  • shsvcs.dll
  • themeui.dll
  • uxtheme.dll

These are the website to download these system files:

For Windows Vista(32bit):http://www.withinwindows.com/uxthemes/Windows%20Vista/SP0/6.0.6000.16386_XX.rar

For Windows Vista(64bit):http://www.withinwindows.com/uxthemes/Windows%20Vista/SP0/6.0.6000.16386_XX_AMD64.rar


For Windows Vista(32bit) Service Pack 1:http://www.withinwindows.com/uxthemes/Windows%20Vista/SP1/6.0.6001.18000_XX.rar


For Windows Vista(64bit) Service Pack 1:http://www.withinwindows.com/uxthemes/Windows%20Vista/SP1/6.0.6001.18000_AMD64_XX.rar


After download the RAR file,extract it using WinRAR(download here) or 7-Zip(download here),you will get the three .dll file.
Highlight that 3 .dll file can right click "Take Ownership" it.

Rename that three .dll file so that user can easily copy the file.Example simply add a "backup" at last of each file name.Such as "shsvcs_backup.dll"

After that go to Windows Explorer type in "%windir%\System32″.

Copy and paste that three 'Take Ownership-ed" .dll file in that folder.

Restart yout system.Now your system is ready to use third-party theme.

Download the third-party Windows 7 theme from:
http://www.mediafire.com/download.php?cod0z1zykoj

or

http://www.megashare.com/523729


Extract the zipped folder.Copy the folder(containing a .theme file and a folder containing .msstyles file) to "%windir%\Resources\Themes\" folder.

Now user can go to Personalize(right click on the desktop),click on "theme" will find a new theme from the drop-down list.Apply it.


Credit


Labels: ,

Google Search Box Is Bigger Now

Posted by Milan at 9.12.2009
Share this post:
Ma.gnolia DiggIt! Del.icio.us Yahoo Furl Technorati Reddit

In a nod toward usability, Google increased the size of its home page’s search box and typeface Wednesday, making it easier for users to see long queries.

“Over the past 11 years, we’ve made a number of changes to our homepage,” Marissa Mayer, the company’s vice president of search products and user experience, said in a blog post. “Some are small and some are large. In this case, it’s a small change that makes search more prominent.”

She acknowledged that it was a simple change but said it “makes our clean, minimalist homepage even easier and more fun to use.”

That didn’t stop the snark from techies who considered it an underwhelming tweak. Search Engine Land’s Matt McGee blogged: “Fresh off of patenting its home page design, Google is throwing caution to the wind and messing with success: It’s making its search boxes bigger. (Gasp!)”

“Google is not just going to let Apple dominate the news today with their new product announcement and Steve Jobs re-appearance on Apple’s stage,” Arnold Zafra wrote on Search Engine Journal.

On Slashgear, Chris Davies wondered whether the change will be widely noticed, since so many Web users search through browser toolbars, mobile applications or Google’s own Chrome browser.

Softpedia’s Lucian Parfeni said the update might be a concession to netbooks, since larger fonts and Chrome itself take advantage of smaller screens. “With Google planning to get into netbooks with its very own, purpose-built operating system, Chrome OS, and netbooks being the perfect home for its suite of web apps, it doesn’t take too much of a stretch of the imagination to say that Google is really interested in the minute mobile computers and that it would modify its homepage to make it easier to use on the small screens,” he said.

Credit

Labels:

Free Tool To Tweak Windows 7

Posted by Milan at 9.11.2009
Share this post:
Ma.gnolia DiggIt! Del.icio.us Yahoo Furl Technorati Reddit


Windows 7 Little Tweaker is a simple windows utility that tweaks,settings and adds a few additional features to Windows 7 menus. Windows 7 Tweaker can disable low disk space warnings, the UAC, speed up Explorer navigation, and do a lot more.


Windows 7 Tweaker is free and can be downloaded from here

Labels:

Free Axence Tool To Network Scann and Monitor

Posted by Milan at 9.10.2009
Share this post:
Ma.gnolia DiggIt! Del.icio.us Yahoo Furl Technorati Reddit

One aspect of computer network management, which can be challenging to some, is allocation and tracking of IP addresses. There are a variety of methodologies on how to keep track of them, be it a simple spreadsheet log or a monitoring tool, which constantly tracks distribution and use. While opinions vary on how to best use IP addresses, either dynamic or static, or a mixture of both, each node on a network will ultimately require one type or the other.

In the dynamic environment, each time a node’s network interface is powered on, it is assigned an IP address by a service like DHCP. This type of address is assigned for a predetermined period of time, based upon the service distributing the addresses. In a static IP address environment, each node (computer, network equipment, or otherwise) is assigned an IP address on a more permanent basis, and the address stays with the node until such time as a technician manually alters the address by hand, by login script, or other methods.

In order to keep tabs on how many IP addresses are being used, most people will lean towards having some type of utility to monitor the usage and distribution. Axence Net Tools Pro is a collection of scanning and monitoring tools for IP addresses. Instead of having several different brand of network tools, Axence combined popular utilities into one graphical interface.

Also, be sure to check out our previous reviews of network software such as Wireshark, a free network sniffer and protocol analyzer, TCPView, a free software to monitor TCP connections, and EventSentry, a free software to monitor events logs.

Upon opening up Axence Net Tools Pro, the user will notice a strip of icons, which represent each of the abilities this software has to offer. Beginning on the left hand side of the icon strip, we have the NetWatch tool. NetWatch allows the user to continually add IP addresses to monitor for ping response to a given host. Simply type in the IP address in the Address field, and then click on Add to include it for monitoring. You can also adjust the signal time increments and timeout threshold in this same screen.

NetTools1

The Ping icon will bring a utility that, at its core, is the same as using ping from a command line shell. The difference here is that the user gets a graphical representation of pings and ping response time. One can, if desired, alter the packet size, signal time increments, and timeout values, similar to the NetWatch interface. As a side note, altering the packet size is one way to test a firewall, as most should drop non-standard sized packets.

NetTools2

The Trace icon is really a graphical wrapper for the tracert command line tool. This is a useful tool for bouncing signals off a node on a WAN type interface, to see where the packets are routed through. If one has geographically dispersed network segments, the Trace tool comes in handy, especially when troubleshooting slow connections. It never hurts to spot check your managed public IP addresses. The same adjustments with the Ping tool, can be used here, with the addition of the number of hops the Trace scan takes.

NetTools3

IP address responses seem longer than normal? This is a good time to look at the Bandwidth icon. Enter the target IP address in the Address field, then click on Start. The graph below will (unless the target is offline, or IP address is invalid) then begin to draw a line graph, and display bandwidth and packet information on the left hand side of the screen.

NetTools5

If you need run a quick check on a particular IP address, one might consider using the NetCheck tool, instead of Ping. NetCheck is geared more towards testing the quality of the signal response, than just the response itself. Here you can alter the number of packets to send, and are presented with a choice of Auto, LAN, or WAN. Most of the time the Auto selection will work, however, you may want to consider the WAN option if scanning across Internet connected Virtual Private Networks.

NetTools6

Of course no IP management tool is complete without the ability to scan entire subnets, and Net Tools Pro is no exception. The user can click on the Scan network icon to switch to a tool that combs the subnet for active IP addresses. In the screen shot below, a Class C subnet is used to scan for alive IP nodes in the 192.168.3.0 network. This particular Scan type is Hosts only, meaning this scan is only looking to see if IP address responds or not. While one can specify to poll each node for a range of open ports, this is up to the user to decide how much time they have available.

NetTools13

Once of the benefits to using Net Tools Pro is the Export option. Any of the tool screens can have their results exported to different file formats. For instance, using the Ping tool, one can click on File, then Export, and have the formats of HTML, XLS, TXT, and XLS available for their use. This export shows the response time data. Using the export feature in conjunction with the Scan network tool, cuts down on the time it takes to type out a list of IP addresses. Instead of manually creating a spreadsheet, export the scan results to an XLS or TXT file.

Keep in mind that not all tools have the same export options. The Bandwidth tool will export in a graphics file format (like Bitmap) and will display the graphed result of the bandwidth response. In any event, you can create data files to save for logging or historical purposes.


Credit


Labels:

How to Recover Windows Password

Posted by Milan at 9.08.2009
Share this post:
Ma.gnolia DiggIt! Del.icio.us Yahoo Furl Technorati Reddit

Want to crack windows passwords try this trick. There are also a lot of ways and hacks to allows Windows users to find and get back their forgotten password for the Windows user account. If you're the regular normal user, you can still log on to the administrator account to reset the password, but if you're using the administrator user id itself, then you're out of luck. Some service such as Login Recovery helps to retrieve and recover the Windows user name and password for Windows XP, 2000, NT and Longhorn Server. However, you will need to let the third party process the password recovery, which effectively reveal the password to them. For security reason, now you can recover and get back the Windows user or admin password from local computer which you've forgot the password itself with Ophcrack 2, with password retrieval process takes place locally.


Ophcrack2 is a open source Windows password cracker or password auditing utility which is an improvement over original Ophcrack 1.0 developed at EPFL. Ophcrack hacks and cracks the Windows password LM hashes based on a time-memory trade-off using rainbow tables. Basically, Ophcrack works by using rainbow tables which contains precomputed hashes of possible alphanumeric and character table sets, so that the program can iteratively compare the windows hashes to precomputed bits and compute the hash and its value more quickly in a more effective way than brute-force guessing. Thus, Ophcrack features ability to reveal, recover and crack most of the alphanumeric passwords which contains up to 14 characters almost immediately, usually within just a few seconds, and at most a few minutes.

Ophcrack 2 comes in the form of Windows installer (currently Ophcrack 2.3.3) and Ophcrack LiveCD (currently Ophcrack LiveCD 1.1.3) which automates the retrieval, decryption, and cracking of passwords from a Windows system. The Ophcrack Live CD contains a live linux distribution, ophcrack and an alphanumeric table set (SSTIC04-10k). The CD is bootable and will automatically load linux, search for Windows partitions and then extract Windows' SAM to start ophcrack to crack the password hashes it finds. Without installing anything on the PC, LiveCD allows users to not only recover and retrieve their lost or forgotten password, but also to hack and crack the passwords on any Windows machines, although it can be used for testing the strength of passwords.


Ophcrack 2.3 comes with a GTK+ Graphical User Interface and runs on Windows, Mac OS X on Intel CPU and Linux. Ophrack Windows installer, Linux source package and Ophcrack LiveCD can be downloaded from SourceForge. For Ophcrack LiveCD, you must burn it to a CD in order to use it to boot up the computer. For Windows installer and Linux source, you will also need to download Rainbow alphanumeric table sets from http://lasecwww.epfl.ch/~oechslin/projects/ophcrack.

It has 2 rainbow alphanumerical tables sets available for free, SSTIC04-5k (720MB) for machines with at least 512M of RAM, and SSTIC04-10k (388MB) for machines with at least 256M of RAM. You can opt to download the rainbow tables component automatically and directly from the installer itself.


If you cannot log on to the Windows because you have forgot the password, the LiveCD is the way to go. To use Ophcrack windows app, just install it and run it. Click on Load and select the appropriate password LM (LAN Manager) hash to use. If you have already dump and save the hash with utility such as pwdump2, then choose "PWDUMP File". Else you can choose encrypted SAM to allows Ophcrack to dump the hashes from the SAM and SYSTEM files retrieved from a Windows machine while booting on another disk, where there is no need to know a Windows administrator password to get the hashes. Other options been local SAM which dumps the hashes from the Windows machine the program is running on and remote SAM which dumps the hashes of a remote Windows machine, which both require the username and password of an administrator and the later also requires the name of a share.

Next, click on Tables, and select the location or folder that you store the rainbow hash tables downloaded or installed by the installer. The select the tables type you want to use. And finally, click on Launch button to start the cracking process.

If you're using uppercase letters, lowercase letters and numbers only in your Windows password, then the free rainbow table sets should works for you. However, if you're using special characters, or wish to crack NTLM hashes, then the table sets is not distribute for free download. You can order and purchase WebSec06 WS-20k table sets which can crack passwords made of mixed case letters, numbers and 33 special characters including the space character, and NTHASH table sets which cracks NTHASH hashes when LMHASH has been disabled from Objectif Securite

Credit

Labels:

How to Back Up Your Google Chrome Profile?

Posted by Milan at 9.04.2009
Share this post:
Ma.gnolia DiggIt! Del.icio.us Yahoo Furl Technorati Reddit

Since Google Chrome is probably the fastest browser available, it is evident that sooner or later more and more people will leave their old browsers to migrate completely to Chrome.

If you were to ask me, I am waiting for the day when it announces support for extensions and my transition to Chrome would be complete. However, till then we need to rely on workarounds and some external tools to do the important tasks such as browser profile backups, so that we don’t lose our data in Chrome if it stops working.

If you want to just back up your preferences in Google Chrome, it isn’t a difficult task. You just need to copy the preferences file and store it as a backup somewhere else. In Windows XP, you could find that in C:\Documents and Settings\\Local Settings\Application Data\Google\Chrome\User Data\Default. Vista Users would need to go to %localappdata%\Google\Chrome\User Data\Default.

But the above step doesn’t backup your bookmarks and passwords. You could do that individually too but there is a nice software which automates the entire profile backup process for you. Provided by Parhelia tools and known as Google Chrome Backup, this free tool is a must have for any Google Chrome user.

chromebackup

Using this tool, you can backup and restore profiles, create multiple profiles, delete a profile and much more. It has a nice and simple user interface and is quite easy to use. All your preferences, bookmarks, passwords etc can be backed up at one go using this tool.

Google Chrome Backup is available for both the stable and the newer versions of the browser. Download it here.


Credit

Labels:

The Race to Be an Early Adopter of Technologies Goes Mainstream

Posted by Milan at 9.03.2009
Share this post:
Ma.gnolia DiggIt! Del.icio.us Yahoo Furl Technorati Reddit

For decades, the adoption and use of the latest technologies was limited to a subculture: Whether called “tech enthusiasts” or “gadget geeks,” the implication was that most of the world got along fine with older, established products and services, while a smaller group pursued the most leading-edge technology.

But according to a study released Wednesday by Forrester Research, a marketing firm based in Cambridge, Mass., a shift has taken place. What used to be the pursuit of a few has become decidedly mainstream. We’re all gadget geeks now.

According to the study, which surveyed 53,668 households in the United States and Canada by mail, half of all American adults are gamers. Sixty-three percent of American households have a broadband Internet connection. Three-quarters of American households have cellphones and PCs. And nearly 10 million American households, out of nearly 118 million, added an HDTV in the last year, a jump of 27 percent over 2007.

“There’s really no group out of the tech loop,” said Jacqueline Anderson, an analyst with Forrester who was one of the study’s authors. “America is becoming a digital nation. Technology adoption continues to roll along, picking up more and more mainstream consumers every year.”

High-definition television sets were one of the fastest-growing consumer technologies in 2008. Over the next five years, the company forecasts, nearly 39 million households in the United States will get their first high-definition set, bringing total market penetration for HDTV to nearly 70 percent.

The study also found that despite the recession, online spending remained strong, with older consumers leading the charge. On average, those consumers spent $560 in the last three months, although “20 percent of that group spent more than $1,000 online in the last three months,” Ms. Anderson said. Given the tumultuous economic climate, “that’s a lot of money,” she said.

Ms. Anderson also pointed out that families were a big driver behind the widespread adoption of technologies. The popularity of video game consoles like the Nintendo Wii, which took a decidedly different approach from other game-console makers by appealing to nongamers and families, created an opening for more digital entertainment to enter the home.

Families are also more likely to have gadgetry like MP3 players, digital cameras and digital camcorders. “They have little kids so they want to catalog those memories,” Ms. Anderson said. In addition, 86 percent of families with children had mobile phones but were also more likely to use mobile phones with more features like music and video playback.

The study also suggests a growing reliance on the Internet for commerce, communication, entertainment and social lives, said Charles S. Golvin, an analyst with Forrester Research, and a co-author on the study.

“The digitization of our daily lives has been steadily ramping up over the past decade,” Mr. Golvin said.

One area that appears to be slower to catch on is home networks. The survey found that 33 percent of households in the United States with an Internet connection reported having a home network, up from 28 percent a year ago. Although Ms. Anderson says that figure is relatively high, the adoption is still lower compared with the adoption of other home technologies.

“The barrier to entry for a home network is a lot higher than for an HDTV, where all you have to do is buy one,” she said. “There are more components and you have to understand how to connect them. Many people had the components for a home network before but didn’t necessarily understand what it meant to put them together or why they’d want to,” she said. In the next five years, the company forecasts, more than 30 million households will install a home network, bringing market penetration to just over 50 percent.

Already, Mr. Golvin says, more people are migrating away from the home and office to use the Web and turning toward their smartphones. About 15 percent of cellphone owners were using the Internet on their phones in 2008, the study found, showing that, for a growing number of Americans, there is an increasing “expectation that all the same services and resources are available to us no matter where we are,” he said.

Credit

Labels:

Apple iPhone: Turning On-Off Bluethooth

Posted by Milan at 9.02.2009
Share this post:
Ma.gnolia DiggIt! Del.icio.us Yahoo Furl Technorati Reddit

If you have an iPhone, you might have been tempted to buy some of the cool bluetooth accessories that come with the phone, like wireless headsets and more!

In order to connect a bluetooth device to your iPhone, you first need to turn on bluetooth. In this post, I’ll walk you through the steps to turn on bluetooth.

Step 1: First, click on the Settings icon on your home screen or wherever you have it located.

iphone bluetooth 005

Step 2: Next click on the General option under Settings.

iphone bluetooth 003

Step 3: Now click on the Bluetooth option on General.

iphone bluetooth 001

Finally, tap the button to toggle bluetooth on or off. Once you toggle it on, it will automatically start looking for bluetooth devices.

iphone bluetooth 004

Tap the bluetooth device and enter the passcode if required to connect the device to your iPhone. That’s it! Now your bluetooth device is setup to work with your iPhone. The next time you turn on the bluetooth device, it should automatically connect to your iPhone. Enjoy!

Credit

Labels:

Category Filter Of Google Adsense

Posted by Milan at 9.01.2009
Share this post:
Ma.gnolia DiggIt! Del.icio.us Yahoo Furl Technorati Reddit

The Google AdSense program is a double-edged sword. On the one hand, it can provide much-needed funds to help run a website, on the other the ads can be very annoying especially if they are for get rich quick, dating, and weight loss schemes, when readers aren’t in the faintest bit interested in such things.
As such, I’ve switched back and forth over the years between running AdSense ads and not. The cash generated by the program for Sciencetext is low, it just about covers hosting costs each month. That said, if there is a traffic spike it might bump up the $$$ temporarily, and pay for my coffee that morning too.
Meanwhile, Google has finally added a new level of filtering for publishers and bloggers so that they can block certain types of ads. Needless to say, as soon as this was enabled on my AdSense account I immediately blocked the ads that are most commonly scams and other junk.
If you’re running AdSense on your site, the Ad Review Centre is where you want to be (it’s under the AdSense Setup tab) set select up to five categories of ads to block on your own site. If you know how to run AdSense, then I don’t need to hand-hold you through the category selection process. The ARC tells you what percentage of your AdSense revenue comes from each ad category. Of course, I wouldn’t block any that make a substantial amount for you, unless you’re feeling overly generous.
Meanwhile, you will continue to see contextual ads on Sciencetext but you will no longer be exposed to the most irrelevant and irritating categories. Of course, if you’re using NoScript or AdBlock+ in Firefox, you probably aren’t even aware that Sciencetext is running AdSense at all. Although if you are, you may be depriving me of my coffee too, sadly…

Credit

Labels:

No Folder Options in Windows?

Posted by Milan at 8.31.2009
Share this post:
Ma.gnolia DiggIt! Del.icio.us Yahoo Furl Technorati Reddit

NoFolderOptions Policy hides Folder Options from Control Panel, and the Folder Options… command under Tools menu in Windows Explorer. The Folder and Search Options command in the Organize menu (in VISTA) is grayed out as well. If your system is not part of any network and this restriction was enabled without your knowledge, it could be caused by Virus or Malware.


There are plenty of viruses which enable the NoFolderOptions Policy in the registry, and in addition, hides file extensions for known file types.


To get the option back, use one of these methods: Using Registry Editor Launch Regedit.exe and navigate to:

HKEY_LOCAL_MACHINE \ Software \ MICROSOFT\ Windows \ CurrentVersion \ Policies \ Explorer -and- HKEY_CURRENT_USER \ Software \ Microsoft \ Windows \ CurrentVersion \ Policies \ Explorer

Delete the NoFolderOptions value (if found) from the above locations Exit the Registry Editor. Using Group Policy Editor Group Policy Editor is not available in WINDOWS XP Home Edition and Windows Vista Home Editions. For all editions of Windows XP and Windows Vista, you may use the .reg file (under paragraph "Registry fix") to remove the Policy setting. Note that this only resets the NoFolderOptions per-user Policy, whereas NoFolderOptions can be a per-machine setting as well. 1. Launch GPEDIT.MSC 2. Navigate to the following branch: User Configuration Administrative Templates Windows Components Windows Explorer 3. Double-click Removes the Folder Options menu item from the Tools menu 4. Set it to Not configured Registry Fix Download folderopt.zip, unzip and run the file folderopt.reg.

Credit

Labels: ,

How to Delete Your Yahoo! Mail Account

Posted by Milan at 8.30.2009
Share this post:
Ma.gnolia DiggIt! Del.icio.us Yahoo Furl Technorati Reddit

Do you Yahoo! but no longer want to? Whether you want to close your Yahoo! Mail account because you move on, because it is an old account you check only very rarely or for any other reason, it is probably easier done than pondered.

What Deleting a Yahoo! Mail Account Will Cost You

If you delete your Yahoo! Mail account, you also lose your Yahoo! GeoCities page, your My Yahoo! settings, your Hotjobs profile and other data in services belonging to the Yahoo! empire. If you are paying for any Yahoo! subscription services such as Yahoo! Mail Plus, it is probably best to cancel these first to avoid unexpected payments.

Also be aware that people will still be able to send messages to your closed Yahoo! Mail account for 90 days without getting a delivery error while you cannot log in to your account to see them. So make sure you tell all your friends and contacts when you are about to terminate your Yahoo! Mail account.

Delete Your Yahoo! Mail Account

To delete your Yahoo! Mail or Yahoo! Mail Classic account:

  • Visit the Terminating Your Yahoo! Account page.
  • Type your password under please confirm your identity with your password..
  • Click Terminate this Account.
  • Wait 90 days for Yahoo! to delete data (such as email messages) associated with your account.
    • Data connected to a Yahoo! Finance Premium account will be kept for 3 calendar years.

Labels:

ChromePlus To Improve Google Chrome

Posted by Milan at
Share this post:
Ma.gnolia DiggIt! Del.icio.us Yahoo Furl Technorati Reddit

If you've been using Google Chrome because of it's sleek interface and ultra-fast load times, you might have noticed that it comes at the expense of a few certain features that we've come to love, such as add-ons!

The current release version of Chrome has a few built-in add-ons, but that's it! There is no other way to enhance Chrome at this point. Alas, someone decided that they needed to do something and ended up packaging Google Chrome along with a few enhancements.

ChromePlus is a nifty little program that adds a couple of nice features to the Chrome browser. At this point, it's only five additional features, but they are planning a lot more in the future.

chrome plus

Here are the new features you get with ChromePlus at this time:

1. Double click – Ability to close a tab by simply double-clicking on the tab at the top

2. Gestures – Ability to use mouse gestures to run commands or perform actions. Holding down the right-mouse button and moving left is like clicking the Back button, right is Forward button, Up and Left is previous tab, etc.

3. Super drag – If you have a page with a bunch of links and you want to follow that link into a new tab, just click and drag it with your left mouse button and drop it somewhere else on the page.

The link will now open in a new tab. Pretty nifty in case you want to keep the current page open also.

Secondly, dragging and dropping some text on the page will open that page in a new tab with the ability to search the text.

4. IE tab – If you've used IE 8 before, you know they have a button at the top near the address bar that lets you switch into compatibility mode in case a website does not load properly in IE 8.

ChromePlus has a similar feature, but for IE. If the site is not loading in Chrome, press the button to switch to IE and the page will render using IE.

chromeplus

5. Download tools – You can right-click anywhere on the page and get a context menu with built-in download functions like Download with Orbit, Download with FlashGet3, etc.

enhance google chrome

You can set all the options by clicking on the Tools button and then choosing ChromePlus Options.

chromeplus options

Overall, it's worth downloading if you enjoy using Chrome as your default browser. The extra features are definitely nice. So give it a shot! [via NirmalTV]

Labels:

An overview of Microsoft Security Essentials

Posted by Milan at 8.29.2009
Share this post:
Ma.gnolia DiggIt! Del.icio.us Yahoo Furl Technorati Reddit

Was it inevitable? For years, Microsoft has taken a great deal of criticism regarding their security, or lack thereof, with the Windows operating system. Some may argue that because of the widespread distribution of the Windows OS, it just makes it a more practical target. Other point to poor programming of Windows code making it easy for attackers to compromise system features.

In any event, other third-party security applications have traditionally been relied upon to protect Windows. Symantec, McAffee, Grisoft, Kapersky, and a whole host of other security software manufacturers were deemed as a necessity to keep Windows safe and defend against computer malware and other security threats. Taking note of this, Microsoft began to develop, or source, protection for their operating systems.

Windows Defender (previously known as Microsoft AntiSpyware, and GIANT AntiSpyware prior to Microsoft’s acquisition) was an attempt by Microsoft to give the Windows community a free, real-time security tool. Unfortunately, poor marks from a variety of software testing groups continued people to look for solutions elsewhere. As secondary pitch into the security software market, Microsoft made the One Care product. This time around, the package was a paid subscription, akin to most other vendors. Once again, Microsoft’s solution did not provide the best security, but was better than Defender alone.

Now there is another Microsoft product being readied for consumer consideration. Microsoft Security Essentials (also known as Morro, and to be referred to as MSE moving forward) is the latest venture by Microsoft into the security software market. Reportedly aimed at replacing One Care, this utility is still in the Beta mode process and will not be finalized until later this year. Keep in mind that this is not the final product and this is more of a sneak peek at the tool.

After installing MSE, and opening it, the user will notice four large tabs: Home, Update, History, and Settings. Initially, the Home tab is shown. Within this section, one is presented with three quick choices for scanning: Quick, Full, and Custom. While Custom choice allows for selection of specific drives or folders, choosing Quick or Full, then clicking on Scan Now, will initiate an immediate scan.

MSE1

The next tab is Updates. There is really not much to accomplish in this section other than mashing the Update button if you see that MSE is out of date. A small display annotating the date of your current malware definitions is shown, serving only as a reference. Though the updates cannot be scheduled, for the current software release, you can instruct MSE to search for updates before running a scan. This option is found in the Settings tab.

MSE11

The History tab, while meant as another reference tool, holds pertinent information. This tab is where you can go to view the history of what MSE has found on your computer, when it found the items in question, and what actions it took (Removal, Quarantine, Allowed, etc.).

MSE13

Additionally, you can click on one of the entries, and get some information on the malware and what MSE recommends as an actionable response.

MSE15

Depending on your particular tastes, you may be someone who likes to changes things at any point in a program. However, if your preference leans more towards a consolidated area for program options, then MSE’s Settings tab is right up your alley. Instead of littering the countryside, so to speak, with choices, Microsoft located all of MSE’s program choices in one section (with the exception of the Custom Scan).

MSE4

Under the Settings tab, the left-hand side holds the Settings tab, sub-menus, while the right-hand side displays the sub-menu contents. Clicking on Scheduled scan will bring up the choices for altering the default 2:00 AM selection. Here, you may change the day, time, and scan type for your scheduled scan; or turn it off. This is also the area when you tell MSE to check for updates before running a security scan.

MSE2

Though the other sub-menus are each useful, one to pay attention to is the Default actions menu. This is where MSE is preset to take actions it deems appropriate based upon the virus, spyware, or unknown programs, it locates during a scan. There are four categories here: Severe Alert, High Alert, Medium Alert, and Low Alert. Each of them can be reset to either let MSE make the decision for you, Remove the problem, Quarantine, or Allow something to run. Allow is not a choice for Severe, and High Alerts.

MSE3

While you could leave the Severe and High Alert levels at their default setting, it may be best to Quarantine the Medium and Low Alert levels. The reason for doing this is because many security software products may take a best guess as to what it found during a security sweep.

Granted, the software it found may be legitimate, but the anti-malware application might not have it on its list of safe programs. Outright removal of the software can damage it, but Quarantining can be a safer approach if you want to put the scanned files back into place, and not have them accidentally removed from your computer.

It is nice to see Microsoft making better strides with security. Will MSE be a decent security tool? Will it outperform Defender and One Care? Only the final release will be able to tell.


Credit

Labels: